Solar Panel Installation on a Cruising Boat: A Complete Guide
Your complete cruising guide with anchorages, clearance tips, and local knowledge.
Solar is the backbone of energy independence on a cruising boat. A well-designed solar installation produces enough power to run your daily electrical loads — autopilot, refrigeration, instruments, communications, watermaker — without running the engine or a generator. In the tropics, where sunlight is abundant and consistent, a properly sized solar array can eliminate engine charging entirely, giving you the silence at anchor that's one of the genuine pleasures of the sailing life.
This guide covers panel selection, mounting options, charge controller sizing, wiring best practices, and the real-world performance you can expect.
How Much Solar Do You Need?
Start with your daily energy consumption in amp-hours (see our electrical systems article for how to build an energy audit). A typical modern cruising boat consumes 200-400 Ah per day. Solar needs to replace this consumption, with margin for cloudy days and panel degradation.
In the tropics, expect roughly 4-5 peak sun hours per day (the equivalent of full-rated output for that many hours, accounting for sunrise/sunset angles, clouds, and atmospheric absorption). A 100-watt panel in the tropics produces approximately 25-35 Ah per day under real-world conditions.
The math: if your daily consumption is 300 Ah, you need roughly 300 / 30 Ah per 100W = 1,000 watts of solar panel capacity. This provides a comfortable margin for cloudy days, dirty panels, and the gradual efficiency loss that occurs over a panel's lifespan.
More is always better with solar. You'll never produce too much power — excess production simply stops when the batteries are full. But you'll frequently produce too little during overcast days, during passage (when some panels may be shaded by the sails), and in higher latitudes where sun hours drop. Size your array as large as your available mounting area and budget allow.
Panel Types
Rigid glass-faced panels are the most efficient and durable option. Monocrystalline panels (identifiable by their uniform dark appearance) are the current standard, offering 20-22% efficiency. They're heavier than flexible panels (roughly 10-12 kg per 200W panel) but they last 25+ years, maintain their efficiency rating, and can be mounted on frames that allow airflow underneath (which improves output by reducing operating temperature).
Flexible (semi-rigid) panels can be bonded directly to curved surfaces — biminis, dodger tops, coach roofs — without frames or mounting hardware. They're lighter (2-4 kg per 100W) and lower-profile. The tradeoffs: lower efficiency (typically 18-20%), shorter lifespan (5-10 years versus 25+ for glass), and they degrade faster because they can't dissipate heat (no airflow underneath). They also develop hot spots when partially shaded, which can permanently damage cells.
For a dedicated mounting structure (arch, hard bimini, or davit top), rigid panels are the clear winner on longevity and output. For retrofit installations where no flat mounting surface exists, flexible panels on an existing bimini or dodger are a practical compromise.
Mounting Options
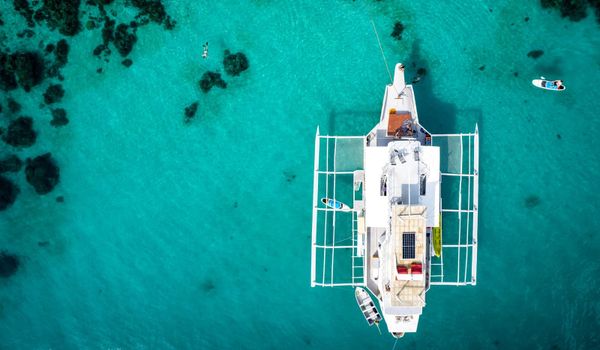
Solar arch. A dedicated stainless steel or aluminum arch spanning the stern, designed to carry solar panels above the cockpit. This is the gold standard for catamaran and monohull installations. A well-designed arch carries 800-1,200 watts of rigid panels, provides shade over the cockpit, and serves as a mounting platform for antennas, radar, wind generator, and dinghy davits.
The arch must be engineered for the weight of the panels plus wind loads in a seaway. A 1,000-watt panel array weighs roughly 50-60 kg; add the arch structure itself, hardware, and wind loading, and the forces on the mounting points are substantial. Through-bolt to structural members — do not rely on deck-mounted feet alone.
Hard bimini / hardtop. A rigid roof over the cockpit, typically fiberglass or aluminum, with panels mounted flat on top. This provides the dual benefit of cockpit shade and solar generation. The construction needs to be strong enough to support the panel weight and the occasional crew member who stands on it to adjust the antenna.
Existing bimini. Flexible panels sewn or lashed to an existing canvas bimini. This is the lowest-cost installation and the most common on boats that weren't designed with solar in mind. The limitations are real: flexible panels on a bimini run hotter (reducing output), they're limited to the bimini's surface area, and the bimini fabric eventually fails and needs replacement (which means removing and remounting the panels).
Deck-mounted. Panels mounted flat on the deck, cabin top, or stanchion-mounted frames. This works for supplemental panels but is limited by available deck space, shading from the rig and rigging, and the foot-traffic conflict of panels on a walking surface.
Pole-mounted / tilting. Panels mounted on hinged brackets that allow them to be tilted toward the sun. This increases output by 15-25% compared to flat-mounted panels, particularly in the morning and evening when sun angle is low. The tradeoff is complexity and windage — tilted panels in 25 knots of trade wind create significant load on the mounting structure.
Charge Controllers: MPPT vs. PWM
MPPT (Maximum Power Point Tracking) charge controllers are the only appropriate choice for a cruising boat. They convert the panel's higher voltage output to the battery's charging voltage with 95-98% efficiency, extracting 15-30% more energy from the panels than a PWM controller. The efficiency advantage increases in conditions where panel output is reduced — partial shading, high temperatures, overcast skies.
PWM (Pulse Width Modulation) controllers are cheaper but less efficient. They waste the voltage differential between panel and battery as heat. For a cruising boat investing thousands in panels and batteries, the $100-200 premium for MPPT is insignificant relative to the energy gain.
Size the controller for your total panel wattage plus a 25% margin. A 1,000-watt array needs a controller rated for at least 1,250 watts. On a 12V system, this means a controller that handles at least 80-100 amps of charge current. Victron SmartSolar, EPEver Tracer, and Morningstar are the leading brands for marine MPPT controllers.
For larger arrays, consider multiple controllers — one per panel group — rather than a single large controller. This provides redundancy (one controller failure doesn't kill the entire array) and allows independent MPPT tracking for panel groups that may experience different shading conditions.
Wiring: Where Most Installations Lose Power
Voltage drop in wiring is the silent thief of solar performance. Undersized wire between the panels and the charge controller, or between the controller and the batteries, converts solar energy into heat in the wire rather than charge in the battery.
Panel to controller: Use the minimum wire gauge that limits voltage drop to 3% or less at maximum current. For a run of 5-8 meters (typical on a cruising boat from arch to controller), this means 6-10 AWG wire for a 12V system. Use a wire sizing calculator — specify the run length (both positive and negative conductors), maximum current, and target voltage drop.
Controller to battery: This run should be as short as possible — ideally under 2 meters. Use heavy gauge wire (4-6 AWG minimum) and fuse appropriately.
Series vs. parallel wiring. Panels wired in series (positive of one panel to negative of the next) increase voltage while maintaining the same current. Panels wired in parallel (all positives connected, all negatives connected) maintain voltage while increasing current. Series wiring allows smaller wire gauge (lower current) and is more efficient for long runs, but a single shaded panel reduces the output of the entire string. Parallel wiring is more shade-tolerant but requires heavier wire.
The optimal approach for most cruising boats: wire panels in series pairs (two panels in series), then wire the pairs in parallel to the controller. This provides a good balance of voltage increase (reducing wire losses) and shade tolerance (one shaded pair doesn't affect the others).
Fuse everything. Each panel string needs a fuse or breaker at the controller. The positive bus from the controller to the battery needs a fuse. Use marine-rated fuse holders and appropriately sized fuses for the wire gauge and expected current.
Real-World Performance
Expect your solar array to produce 60-75% of its theoretical maximum in tropical conditions, averaged over a full day. A 1,000-watt array produces roughly 150-250 Ah per day on a 12V system in the tropics, depending on panel orientation, shading, temperature, and weather.
Factors that reduce real-world output: panel temperature (output drops 0.3-0.5% per degree Celsius above 25°C — panels on a dark surface in the tropics can reach 60-70°C), partial shading (even a shadow from a halyard across one cell can dramatically reduce an entire panel's output), dirty panels (salt spray, bird droppings, dust — clean panels monthly with fresh water), and panel aging (1-2% output reduction per year over the panel's lifespan).
Monitor your solar production daily using the charge controller's data output or a battery monitor. Over time, you'll develop an intuitive understanding of what your array produces under various conditions — sunny day in the trades, overcast day, sailing with partial rig shading — and you'll manage your energy budget accordingly.
The Integration
Solar doesn't exist in isolation. It's one component of the energy system that includes batteries, charging sources, and consumption loads. The solar installation should be designed as part of the whole system:
Size the battery bank to store at least 1.5-2 days of solar production (so that a cloudy day doesn't leave you short). Configure the charge controller for your specific battery chemistry (LiFePO4, AGM, gel — each has a different charge profile). Set the controller's charge parameters to match the battery manufacturer's specifications — incorrect voltage limits reduce battery life.
Install a battery monitor (Victron BMV, SmartShunt) that tracks net energy flow — solar production minus consumption — so you know at a glance whether you're net positive or negative for the day. This single piece of information transforms energy management from anxiety to awareness.
Solar is the quietest, most reliable, and lowest-maintenance power source on a cruising boat. Install enough of it, wire it properly, and keep the panels clean. The sun does the rest.
References: Victron Energy, Practical Sailor solar panel tests, Marine How To (Rod Collins), Nigel Calder, cruising community installations